part1
part2
part3
Thursday, July 22, 2010
Wednesday, July 21, 2010
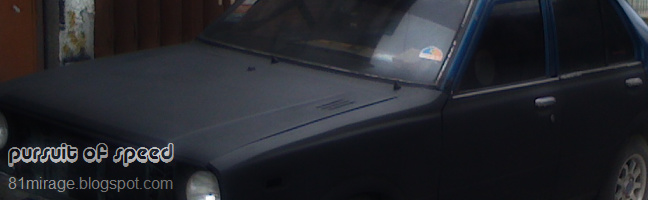
slex cruise at 160kph
test drive of BM(86 gt lancer) after installing a cam6 and cleaning intake manifold and a stock carburetor.
Friday, July 2, 2010
rally pace notes for noobs
ever wonder how rally drivers and navigators talk? here's a simplified tutorial video for newbies from rallynotes.com
wikipedia also has an entry about pace notes.
crash.net also gave a translation of petter solberg's co-driver phil mills pace-notes from 2004 acropolis rally:
It's well known that top WRC drivers need accurate pace-notes in order to win - but it's not just as simple as telling them which way to go. Look at a co-driver's notes on paper and they look like hieroglyphics. Hear them read out and instructions like 'left tightens', 'right plus' and 'over crest into short' don't make much sense either. So here Petter Solberg's co-driver Phil Mills translates a bit of the language that's used by professional rally drivers and co-drivers...Pace notes from Acropolis Rally 2004: SS4 / SS7 Pavliani:1. Start, 30, Keep left over a crest into short 4 right plus opens, 60, crest and 6 right plus and don't cut short 6 left minus.2. 60, line into 2 right minus over a bump tightens to a hairpin over a ditch.3. Into 6 left long opens over a crest, 30, 6 right into 3 left plus long don't cut tightens to 1, into a short 1 right plus and short 2 left minus tightens at junction (junction 2 at 0.6kms) 20.Translation:1. Start, drive 30 metres then keep left over a crest into a fast fourth gear right-hand corner, accelerate for 60 metres to a crest, then stay in the middle of the road for a sixth gear left hand corner in half throttle.2. Drive 60 metres, keep to the left hand side of the road for a second-gear right-hand corner, which tightens very badly over a bump, at the same time brake hard for a hairpin over a drainage ditch.3. Accelerate flat out into a sixth-gear long, left-hand corner over a crest, drive 30 metres then into a sixth gear right-hand corner, brake hard for a third gear left-hand corner in half throttle. Stay in the middle of the road for their are some bad rocks on the inside, and then brake as it tightens to first-gear, immediately changing direction into a fast, first-gear right-hand corner. Then accelerate into a second-gear left-corner past a junction (junction No 2 in the road book at 0.6 Kms), carry on for 20 metres.
article source: team talk: pace notes explained
Friday, June 25, 2010
roll cage article: from safetydevices.com
the inspiration

i came across hodrod magazine - jan 2009 issue and the pics on page 26 gave me the chills: tubular space frame chassis! so there's no turning back now.
with a little research, i found the thread of this great build. i was in awe while looking at the pictures.
read the build at bruning auto design's '70 challenger w/ twin turbo hemi & c5 suspension thread on the lateral-g.net forums
and see some pics at hubgarage.com
Tuesday, June 22, 2010
rauno aaltonen talks about mini
 "the rally professor" rauno aaltonen, the inventor of left-foot braking, talks about good'ol mini:
part 1 of 3
part 2 of 3
part 3 of 3
and here's a bonus on basic stuff on rallying by rauno himself
Friday, June 18, 2010
tube frame car build
from: lotustalk.com - visit the page My Tube Frame Car build for other pics

i can only say this is a great inspiration for me. and now the video:
rwd mitsu quick shift

"Word of advice.. this will involve having to cut and weld that little ball at the end that goes into the shifter mechanism so your welder has to be very good and very accurate so it will work properly. This is not something I would suggest to DIY."
phil de lange(dog283)thanks for the share bud. i hope you don't mind if i post it here
Thursday, June 17, 2010
fia intl sport sporting codes regulations
appendix j to the international sporting code: link for the safety equipment regulation - like seats, harness, chassis, etc.
4g13 modifications
since my mirage is fitted with a 4g13 mitsubishi engine, i searched the interweb for it's specs - mainly, it's weight. i need to know the engine weight for the calculation and triangulation of space frame. i don't know if it's fortunate or not. but, it lead me to some modifications for the engine
here they are:
Wednesday, June 16, 2010
how to break-in
1. from: custompinoyrides.com
page: Engine Tech: How To Break-in your High-Performance Street or Racing Engine written by Ben Alameda
page: Engine Tech: How To Break-in your High-Performance Street or Racing Engine written by Ben Alameda
If you have a High-Lift Camshaft, Start and bring the engine to Racing Temperature (160 degrees at least). Then let it cool down on its own and re-start the process again “half a dozen times or more”. If you have the patience to do this. The reason is for your “NEW” valve springs to be slowly “heat conditioned to its stressed environment”!
Once you have gone through your heat/cool cycle, Go out and slowly accelerate your engine to mid-RPMs and immediately let go of the gas and let it “Engine Brake” with out forcing it too much. Next go out to a faster speeds and let-off the gas and down-shift without forcing it from 4th to 3rd to 2nd and finally to 1st!
DO THIS ABOUT 6-12 TIMES AFTER YOUR HEAT CYCLING HAS BEEN DONE. AND IF YOU DO A “LEAK DOWN” CHECK – THE ENGINE RINGS WILL BE SEALED!
(This Engine ritual takes about 15 minutes and 4-8 miles)
2. from: mototuneusa.com
The Short Answer: Run it Hard !Why ??Nowadays, the piston ring seal is really what the break in process is all about. Contrary to popular belief, piston rings don't seal the combustion pressure by spring tension. Ring tension is necessary only to "scrape" the oil to prevent it from entering the combustion chamber.If you think about it, the ring exerts maybe 5-10 lbs of spring tension against the cylinder wall ...How can such a small amount of spring tension seal against thousands ofPSI (Pounds Per Square Inch) of combustion pressure ??Of course it can't.How Do Rings Seal Against Tremendous Combustion Pressure ??From the actual gas pressure itself !! It passes over the top of the ring, and gets behind it to force it outward against the cylinder wall. The problem is that new rings are far from perfect and they must be worn in quite a bit in order to completely seal all the way around the bore. If the gas pressure is strong enough during the engine's first miles of operation (open that throttle !!!), then the entire ring will wear intothe cylinder surface, to seal the combustion pressure as well as possible.
Saturday, June 12, 2010
sparco seat and sabelt 4pt harness
back to the storage room to check out some parts. the red sparco seat i bought last year struck my eyes and i decided to mount it on the lancer. removed the railings it came with, i took off the shoulder and lap strap hole cover(whatever that is) and stitched the gaps to make it presentable. added a nice sabelt 4pt harness and "viola"! a nice bucket seat waiting to be mounted.


scoured the net again about diy installation for the seat and harness. and much to my surprise, it's very technical...
here's an exerpt from the clubgti.com forum
1) MSA requirements:
- Racing requires FIA homologated safety harnesses. Must be 'in date'. The expiry date stitched onto a label on the harness is the last date the harness can be used in MSA / FIA regulated competition
- FIA Appendix J - Art. 253 states that "one anchorage point for two straps [is] prohibited for shoulder straps." Since the MSA refers to the FIA for racing, 3-point harnesses aren't allowed for UK racing.
- Sprinting / hillclimbing requires:
- 3 point safety harnesses for Road-Going Production and Road-Going Specialist cars
- 4-point safety harnesses for Modified Production ('Mod Prod')
- 6-point for Hill Climb Super Sports Cars, Sports Libre and Racing Cars
(all as defined in the MSA Blue Book)- ... but does not appear to specify FIA Homologation (please shout if you know this not to be the case)
- Rallying requires FIA Homologated 4 point safety harnesses (minimum)
- Rallycross and Autocross requires 3 or 4 point safety harnesses (minimum) but does not appear to specify FIA Homologation (please shout if you know this not to be the case).
However, the MSA encourages FIA-compliant harnesses:Quote:
2) Trackday harness requirements:
- Subject to any event officials checking cars, eg whilst noise testing, none
Rough guide to types of harness in existence:
- EEC Approved
- Latch closing mechanisms
- Turn buckle release mechanisms
- Push button release mechanisms
- FIA approved harnesses
Also, design differences:
- 2 inch straps, 3 inch straps, or 3 inch shoulder and 2 inch lap
- Clip on harness straps, designed to fit over eye bolts
- Non-clip on harness straps, which are 'permanent' fixtures
- 3-point, 4 point, 5 point and 6 point harnesses
for more pics and details visit their thread: Motorsport harnesss installs - forum info compilation / FAQ
other sites also have their own version of this. but what am i gonna do? since, im gonna use it for motor sports, i might as well follow fia/aap (philippine local governing body) rules...
off for further research
Friday, May 28, 2010
more on fog lamps: piaa
source: piaa.com
driving lights
"Typically, driving lights are mounted above the front bumper about 14-30 inches from the ground to provide extra high beam illumination. Driving lights can be mounted below the bumper, although they will not be as effective because the light will hit the ground sooner and reduce the range of the light.Visual aim is made with the center of the beam hot spot 1.5 inches below the lamp center at 25 feet with the lamp facing straight forward. (See below.)"

fog/foul weather lights
"Traditional fog lights are usually mounted under the front bumper about 10-24 inches from the ground. There are two important issues to address when installing fog lights, the first is to minimize the amount of return glare into the driver's eyes, and the other is to minimize glare into oncoming driver's eyes. Both must be accomplished while putting as much light as possible on the road.These fog/foul weather light aiming instructions are suggestions taken from common practice and the S.A.E. standard J583. Some modifications to these instructions may be necessary to minimize glare.Visual aim is made with the top of the beam 4 inches below the lamp center at 25 feet with the lamp facing straight forward. (See below.)"

how to choose your lights
 picture from: gizmosforall.com - visit their site for a crash course on automotive lighting.
what i've learned?
3 types of light
- driving light - midrange throw. enough for cruising. (eg headlamps)
- fog light - short range throw. installed below the bumper, less than 24" from the ground
- pencil beam light - long throw paired with driving light. ideal for rally and racing exceeding speeds of 80mph or 120kph
Thursday, May 27, 2010
Fog Lights Installation
i'll be installing a pair of fog lights and i need a diagram to follow. where do i go? the net, of course! then i found the site: old burb club. the specs on the page is identical to what i'm working on. so, i'll post it here just in case. many thanks to the site and all people involve.
"This is the right way to wire a set of fog lights. The relay switches the heavy current to the fog lights with big wire, while the dashboard switch wiring can be very small. This keeps high current and large wires out from under the dash and in the engine compartment where they belong. A typical set of 55 watt lights will draw about 8 amps for the pair. The dash switch will pull only about 0.3 amps to operate the relay.Be sure to run extra ground wires from the fog lights themselves. Don't depend on the cheap spring or case ground to work. Take the light apart if necessary, and add a real ground wire. Run these to the frame somewhere handy. This will keep the lights from being intermittent.This diagram shows the wiring using a Bosch relay. These are found just about everywhere."

Monday, May 24, 2010
Tuesday, May 11, 2010
mighty car mods.com
checking out a video from youtube.com about rolling fenders led me to mightycarmods.com's own video on rolling guards.
also, check out their forums. there might be something interesting there for you.
also, check out their forums. there might be something interesting there for you.
Wednesday, April 28, 2010
net car show.com
seeing some lancias and other makes made me think ti is worth sharing, althought the mitsubishi line is not complete because the 2002 and down models were not included.
lancia 037 rally
lanciarally037.com
it's the website for you 037 fans out there. the site is in italian. but with a little help from google chrome's auto-translation feature, it's a breeze to browse their pages.
i would say the website is so complete as can be, that they even have technical drawing about the 037.
why did i put it here? learning the lancia delta rally should not be limited by the car alone. one should everything that surrounds that car, even the ecv prototype.
Tuesday, April 27, 2010
change of plans
unfortunately, i have to move the target date of completion for another year. funds will be used as down-payment for the new house we bought. i'll use the time to ponder on a different goal for the colt - lancia delta s4 group b rally setup.

Wednesday, April 7, 2010
quick release hoax
unfortunately, the quick release seller was a hoax... the purchase didn't push through because of unknown reasons.
i was there at 9am and informed him that i will be waiting. one hour passed and not a single message or ring. i phoned him at 10am to tell him i cant wait any longer because of my tight schedule. and guess what - his phone is turned off.
i waited the whole day for him to contact me. there might be a good reason for that. and still - no message at all.
early monday morning, i checked his ad and the whole ad was deleted. what an experience.
Friday, April 2, 2010

quick release: shiny and almost new
just found the quick release this morning. the price is a quarter of a brand new unit. even if it's second hand, it's only used for a day. so, technically, it's new. the last two quick release adapters i was aiming to buy are sparco's: colored blue and red and priced at three thousand pesos a set. so, for an unbranded unit that costs 1500 pesos, i just have to test it for it's reliability. i can't wait for sunday.
Thursday, April 1, 2010


Thursday, January 21, 2010
advan turbo for my mirage

 not sure if there are other wheels like these. but im sure they are light weight and are perfect for track days.
electrical diagram sources
i've been studying and working on some electrical wirings for my '86 lancer and found a great source of information over the net:
national t-bucket alliance (ntba)
wiring legends from ntba
additional source:
Subscribe to:
Posts (Atom)

